If you are wondering what rib stitch is or even how to knit rib stitch, then read on……
When knitting rib stitch, you are making textured vertical stripes as you knit.
To knit rib stitch you are basically knitting a variation of knit and purl stitches within the same row.
The most common ribbing knit stitches are those in which there is an even number of knit and purl stitches along the same row.
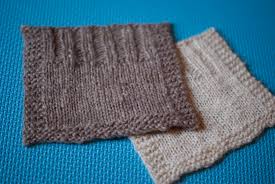
You will normally find ribbing at the bottom or cuff of a sweater or jersey if you want to find an example to look at.
How To Knit Rib Stitch
In order to do rib stitch, you need to alternate between the purl stitch and the knit stitch. Each time you change to another stitch you will need to pass the wool over to the other side of the needle.
1 x 1 Ribbing
 This is the method of knitting one stitch and purling one stitch along the entire row.
This gives the effect of lots of long narrow columns and is a very common form of ribbing at the bottom of sweaters.
This is very stretchy, but when it is not stretched, you only notice the knitted columns as the purl is hidden.
2 x 2 Ribbing
 When knitting the 2 x 2 rib stitch, you are knitting two stitches and purling two stitches along the row.
This stitch is slightly less stretchy than the 1 x 1 ribbing and pulls the knitting in less.
You will need to have a multiple of 4 amount of stitches on the needle so that the pattern works out more evenly.
The elasticity of the final knitted product is effected in the following ways:
-
- The narrower the column of stitches, the more elastic the ribbing.
- Bigger needles result in less elasticity. Also, because ribbed edgings are intended to “hug” the body, you generally work them on needles one or two sizes smaller than the ones used for the body of the project.
There are many different ways to knit rib stitch. you can even try k3 p1 for an interesting pattern, or k2, p5. The variations are endless.
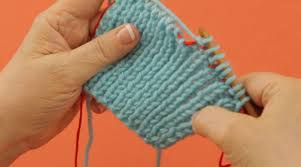
Here is a video that explains exactly how to knit rib stitch. Each time you change from knitting to purl or vice versa, remember to take the wool either to the back for knitting or to the front to purl or you could end up with more stitches on your needle than what you started out with.
Free Knitting Pattern To Try
Here is a fun way to practice knitting ribbing stitch. This pattern will also get you going in the basics of cable stitch.
This pattern features a striking wavy pattern on one side and a textured rib on the other.
Once you have the hang of this, you can even knit yourself a scarf.
Wavy Cable Pattern
Cast on 17sts to practice. With Chunky wool and thick needles, this will be wide enough for a scarf. if you want the piece to be wider then just add another 17 sts. and repeat pattern.
Row 1: (RS): K1, (P2, K1) five times, K1.
Row 2: (WS): K1, (P1, K2) five times, K1.
Row 3: K1, (P1, RC) five times, K1.
Row 4: K1, (P2, K1) five times, K1.
Row 5: K1, (RC, P1) five times, K1.
Row 6: K1, (K1, P2) five times, K1.
Row 7: K1, (K1, P2) five times, K1.
Row 8: K1, (K2, P1) five times, K1.
Row 9: K1, (LC, P1) five times, K1.
Row 10: K1, (K1, P2) five times, K1.
Row 11: K1, (P1, LC) five times, K1.
Row 12: (K1, P2) five times, K2.
Rep rows 1-12 for pattern.
In case you are not sure how to do a Right Cross (RC) and a Left Cross (LC) here is a video that explains it in detail. You will know about this if you have done any sort of cable knitting.
With this way of doing RC and LC, you won’t need a stitch holder.