
It may not be something you have thought about a lot, but if you want to try this cute cow knitting pattern, here goes. The kid in you is going to love this and it is quick and easy to do. Suitable for beginner to intermediate knitters.
This post may contain affiliate links.
How To Knit A Cow Knitting Pattern

For This Cow Knitting Pattern You Will Need:
Pure cotton Yarn – Aran – Charcoal and Natural – 50g each
Pure cotton Yarn – DK – Baby Pink
Brown and Black Embroidery Thread
Pure merino superwash stuffing – 50g
4 mm knitting needles
4 mm double-pointed needles
Yarn needle with a large eye
You can go here for abbreviations you are unsure of in this cow knitting pattern.
To Make:
Body:
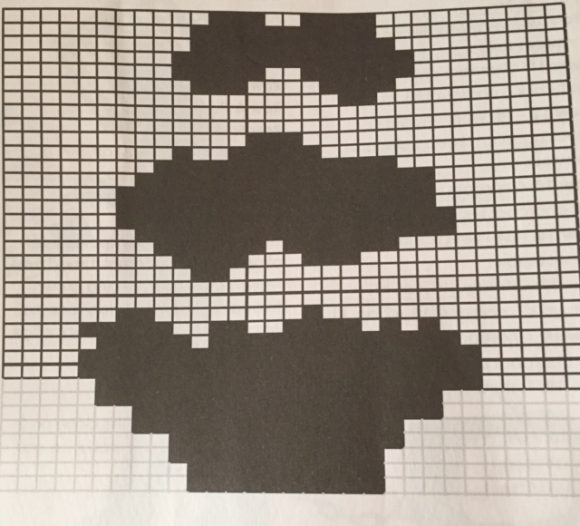
You can do this in plain natural/white or follow the graph below for a black-and-white knitted cow.
Cast on 30 stitches using natural yarn and work 26 rows of stocking stitch.
Row 27: Cast off 5, k to end.
Row 28: Cast off 5, P to end.
Row 29 and 31: K1, (SSK) x2, k to last 5 sts, (K2tog) x2, K1.
Row 30, 32, and 34: Purl
Row 33: K1, SSK, k to last 3 sts, K2tog, K1.
Cast off.
Fold the cow knitting pattern you have just knitted in half (side edges together) and seam the 3 sides, back, bottom, and half of the front, leaving the top front open. This will be the neck.
Stuff with your stuffing, shaping the body into a rounded sausage-type shape. (The long seam will be the bottom of the body).
Legs:
Make 4 of these.
Cast on 8sts using pure cotton Aran Natural.
Work 12 rows in stocking stitch.
Cast off.
Fold the legs in half with the side edges together and seam cast of and side edges.
Stuff the legs evenly.
Attach the legs to the bottom of the body one on each side close to the back and close to the front.
Make sure that you leave enough space between the back legs for the udder.
Udder:
Using the pink cotton cast on 10 sts.
Work 4 rows in stocking stitch.
Row 5: K3, mb, k2, mb, k3
Row 6-8: Work straight in stocking stitch.
Row 9: K3, mb, k2, mb, k3.
Row 10 – 13: Work straight in stocking stitch.
Cast off.
Thread the yarn around all 4 edges of the square. Place a little stuffing in the center and pull up tight to close.
Attach to the bottom of the body between the back legs.
Head Front:
Cast on 5 stitches using the natural yarn.
Row 1: Knit
Row 2: C/on 2, purl.
Row 3: C/on 2, knit
Row 4: Purl
Row 5: K1, ssk, k3, k2tog, k1.
Row 6: Purl
Row 7: Join charcoal yarn. K1, m1, natural k5, charcoal m1, k1.
Row 8: Purl – keep colors as per the previous row.
Row 9: Charcoal (k1, m1) x2, natural ssk, k1, k2tog, charcoal (m1, K1) x 2.
Row 10: Purl – Keep colors as per the previous row.
Row 11: Charcoal k1, m1, k3, natural k3, charcoal k3, m1, k1.
Row 12 – 14: Work straight in stocking stitch and keep colors as per the previous row.
Row 15: Charcoal k3, k2 tog, natural k3, charcoal ssk, k3.
Row 16: Purl – Keep colors as per the previous row.
Row 17: Charcoal k1, ssk, k1, natural k3, charcoal k1, k2tog, k1
Row 18: Charcoal p1, p2tog natural p3, charcoal p2togtbl, p1.
Row 19: Natural k1, ssk, k1, k2tog, k1
Row 20: Purl
Cast off.
Head Back:
Work as for the front of the head.
Rows 1 – 6: Natural and Rows 7 – 20: Charcoal.
Stitch back and front head pieces together, stuff, shaping head before closing the seam. Pull the sides of the head in slightly with a few invisible stitches from side to side around rows 7 and 8.
Ears:
Right:
Cast on 4 stitches using the charcoal yarn.
Row 1: K1, m1, k3
Row 2: Purl
Row 3: K3, k2tog
Row 4: Purl
Row 5: k2, k2tog
Row 6: P1, p2tog, cast off.
Left:
Cast on 4 stitches using charcoal yarn.
Row 1: K3, m1, k1
Row 2: Purl
Row 3: SSK, k3
Row 4: Purl
Row 5: SSK, k2
Row 6: P2tog, p1 Cast off
Attach the ears with the cast-off edge to head-on side seams with one on each side.
Embroider eyes and nose on the front of the head using charcoal thread and French knots for the nose and brown thread and colonial knots for the eyes.
Attach the back of the head to the neck edge of the body.
Tail: Knitted I-Cord
I-Cord is tubular knitting done on 2 double pointed needles or on one circular needle.
Cast on 3 sts using charcoal and **knit across.
Slide the stitches back across to the other end of the needle without turning and pull the yarn firmly across the back of your work.
Repeat from **.
Work 5 rows charcoal and 6 rows natural.
Cut yarn, leaving a tail thread through the sts, and fasten off.
This will give you a stocking stitch cord with the smooth side on the outside.
Take a length of natural yarn about 30 cm long and tie 4 knots along it spaced about 6cm apart.
Thread a darning needle with another length of yarn, push the needle through the knots, holding the knots together, and pull the second piece of yarn through the knots, then starting at the first knot repeat and pull tight to hold the knots together. Stitch the tassel onto the bottom of the tail.
Trim the tassel ends and fray the warn.
Attach the tail to the back of the cow.
You now have a cute knitted cow toy that was super quick and simple. For more on knitted toys click here.
For more on knitting gorgeous animals, try this book.