Mosaic art is becoming very popular, and in this post, I am going to discuss the basics relating to how to do mosaic and how to make your own mosaic treasure.
I started mosaic a few years ago, but at the moment am not finding as much time as I would like for it.
I found doing mosaic to be an extremely stimulating and rewarding way to pass the time. It gets your mind off of your problems because you need to put all your concentration into the cutting and placing of your tiles. Some even say it is therapeutic.
I initially started to mosaic with the intention of making numbers for the outside of our house, but have since ended up making many other useful items, including trays, tissue boxes, remote control holders and signs.
So as you have gathered mosaic art can be quite addictive.
What Do You Need To Make Your Own Mosaic?
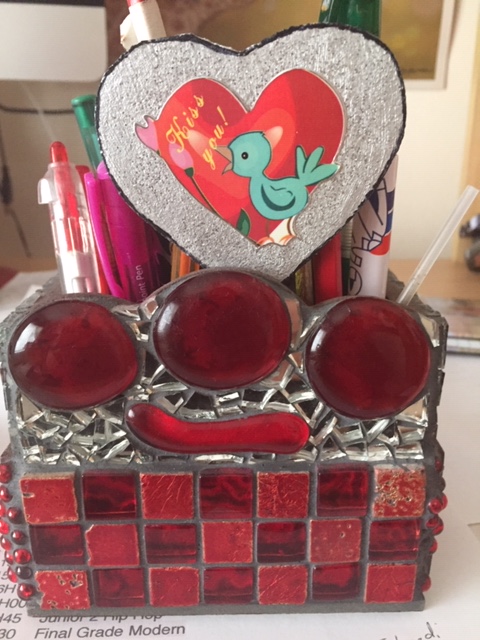
Mosaic is one of the cheapest craft forms (besides paper cutting) to do, provided you don’t go overboard on the fancy tiles. The mosaic above cost me about R80 which is about $10 to make all in all.
It took me a couple of hours to make, but some projects do take more time, especially if you are cutting your tiles very small.
To mosaic, you will need the following:
- Tile Cutter
- Craft Knife
- Old paint brush (artist)
- Tiles
- Glue (wood glue works well for most indoor projects)
- Grouting
- Spatula for grouting
- Sponge for grouting
- Rubber Gloves
- Water
- Foundation to adhere the tiles onto. It could be anything rigid from a wooden cutout to a pot, to a table or
…. - A mosaic kit like the ones below that can be purchased online (always a good idea to start with as a beginner)
- An area to work. Out on a veranda is ideal, as it does tend to make quite a bit of dust.
- Newspaper to work on.


How To Do Mosaic
If you have a wooden surface to work on, first prepare it by scoring criss-cross lines across it with your crafting knife.
Next, make a thin mixture of your glue diluted with about six parts water and seal the wood by painting the mixture on with a paint brush.
Decide on what design you want and what colors you want to use. If you are doing a picture, it is a good idea to draw or trace it onto your foundation as a guideline.
After soaking your tiles in warm soapy water and drying off, cut your tiles with your tile cutter. Make sure to place your hand over them before you cut to prevent the tiles from flying up into the air and possibly landing in your eye.
Next, you start to glue your cut tiles into place, just like you are doing a jigsaw puzzle.
Make sure to work flush with the edges for a more professional look.
The smaller the tiles and the closer together they are, the better the end product looks in most cases. If you are doing an ornament for outside or a big tray, then it is better to use bigger pieces, or you will take years to finish it.
Grouting Your Finished Piece
Now comes the messy part. Once you have finished gluing down all your tiles, you are ready to grout. This finishes off the piece nicely and fills in all the holes.
Make sure the glue is totally dry before starting to grout, or you may find some of your tiles coming off in the process. Use rubber gloves to protect your hands and nails. If you don’t you can use shampoo to get all the grouting off your hands and from behind your fingernails, as it gets everywhere.
Mix your grout with water as per the instructions. The consistency after mixing should resemble toothpaste.
Take a spatula and smeer the grout onto your project, making sure to get the grout into all the cracks. You can also use your fingers to press the grout into the cracks.
Use a damp sponge to smooth the grouting off. Let the grouting dry a bit and then go over it again with a damp sponge. Careful you don’t overdo this part of the process or you will dissolve all your grouting.
Once your grouting is dry polish it with a dry cloth. Mr Min polish also works well here.
Paint your project to finish it off.
So now you know how to do mosaic and how to make your own mosaic easily.
Happy Mosaicing!
Mosaic is very beautiful work if done by someone who knows what he or she is doing.
Just like you, they used to teach us in school and it was nice but over the years I can only buy the one like those that have been done by an expert I would really love to start it again and this time for profit as you have put it.
You will be surprised at what you can create as a beginner, and you do not need to be an expert to make some beautiful pieces. I recommend starting off with something small as I did to get the feel for it.
You are absolutely right about being careful when cutting tile. Tiny pieces will shoot very rapidly in all directions. It may be good to note also that the edges of cut tile can be very sharp as well. I used to lay tile from time to time and have experienced this first hand.
If you do not need specific shapes you may just want to put your larger tile stock in a burlap bag and beat it with a hammer to get smaller pieces to create with. This would eliminate the chance of any tile pieces getting in your eyes.
Interesting post and informative for anyone interested in wanting to give Mosaic a go.
I have seen finished Mosaic creations and they can definitely add a fresh look to any patio, table, or wall.
Thanks for the great tip Paul. It is also cheaper to buy the bigger tiles, and crushing them in this way saves a lot of time.
Hi! Thank you for this detailed post about how to do mosaic. Yeah, I have heard of the benefits of doing mosaic. But I would like to try it myself. I appreciate you have outlined all we need to get started. I’m a complete newbie at this and your post has filled in all the gaps.
I found your explanation about how to mosaic very easy to understand. And now that I comprehend the whole process, I’m eager to start!
Good luck Henry. It is a lot easier than it looks, and once you have completed one item the bug bites and you will be looking for other things that you can make for your home.
It is an awesome craft to get a mental pleasure out of. It is a pride to create these beautiful art pieces.
I have never made one and enjoyed them all the time. The instructions given in this blog is clean and crisp.
Besides, it does not seem that hard to collect the tools.
When learning how to do mosaic, you will need to concentrate and your mind will need to focus on the task at hand. needs deep concentration and involvement of your mind. A good craft of this kind can be attractive to many.
I am wondering how hard is to cut the tiles beside being messy?
If you have a good sharp tile cutter, it is easy to cut the tiles, but the small chips tend to get everywhere, so I advise not to walk in that area barefooted for a while.