How To Make A Memory Box
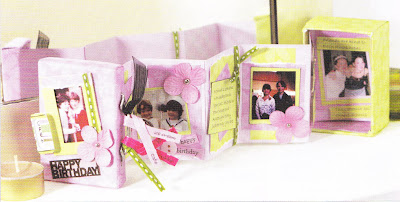
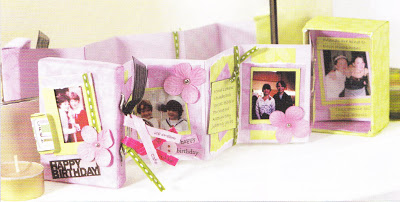
If you are wanting to know how to make a memory box, then here is a great idea. Try making a concertina memory box. This will make a great gift for somebody special.
With this concertina style memory box, you can place loads of great memories in one tiny package. Imagine the delight as they open a box containing pages of special memories that leap out at them just like a jack in the box.
This original mini scrapbook-style project can be used to suit any occasion, and the concertina design allows it to contain as many, or as few pages as you wish.
Whatever the contents, this small album guarantees a wonderful surprise for your loved ones.
How To Make A Memory Box Concertina Style

Before you start, you need to plan ahead, so that you can pack your box with as many memories as possible.
For a partner, it could be a reminder of times spent together, and for a child, you could hoard souvenirs and photos of his or her favorite things and people. This is also a great idea for kids to make of themselves for their grandparents.
What Do You Need To Make A Memory Box?
- Small cardboard box
- Paper for covering the box and some extra paper for the inside of the lid
- Contrasting colored paper for the lid and inside of the box
- Cardstock for the pages
- Pencil
- Glue Stick
- Craft Knife
- Cutting Mat
- Embellishments
- Photographs
- Sticky Pads
- Something to make the box handle like ribbon or wire
Start by tracing around the base of your box on your chosen paper, and mark a flap twice its depth on each side. Trim the corners between the flaps diagonally to the depths of the sides and lightly score for folding.
Place the box on the base of the cut-out paper and fold the flaps up and over to the inside. Tuck the corners in and glue in place. Cover your lid in the same way.
Cut your contrasting paper to line the inside of the box so that it fits across the base and up the two sides and glue in place. Line the lid in the same way.
Cut your cardstock into strips for the concertina pages. Ensure to cut this slightly smaller than the width of the box so that it fits inside easily.
Decide on how many pages you would like and fold the strips concertina-style until you have made enough. Cut and attach extra paper if more pages are required.
Make a small flap at one end to stick to the inside of the box. Children will need some help with this one.
Don’t forget to test your ‘concertina’ out in your box and make sure it fits and closes with room to spare for your embellishments.
Now you can have loads of fun decorating each page with photographs, quotes, flowers, buttons, ribbons or whatever tickles your fancy.
Remember to leave the first page open as this attaches to your lid.
You can then decorate the top of the lid with your choice of embellishments and add your handle or even a ribbon to the side that you wish the box to open from. Once finished you can glue the concertina to the inside of your box and lid.
There are no rules or limitations to what you can add to your box, so go mad and use your imagination with this fun and creative idea.
So that, in a nutshell, is how to make a memory box – concertina style.
Here are some more ideas for getting started with scrapbooking.

I started knitting during my teenage time. It was fascinating as that’s something new that I learn. Like what other people do, I started with knitting a shawl. It was pretty easy. However I never try knitting a box. Is there any online course you can recommend to me if I want to improve my knitting skill?
Thanks for your comment. Although this site has a lot of knitting articles on it, this is not one of them, as I cover all my favorite hobbies. This memory box is more along the lines of scrapbooking.
You can find out all you need to know about knitting here.
My kids love doing arts and crafts. Now that it’s the holidays, we have plenty of time and a memory box is a really good idea. I have never heard of Concertina style but they will absolutely love the idea of it jumping out at them! Luckily I have most of the things on your list so we will definitely give it a go. Thanks for the great idea!
They will enjoy doing this, but its best to start with a few pages at first incase boredom sets in. You can always add pages later.
Luckily most of what you need to make this memory box you should be able to find around the house, which makes it really cost effective.
This is a great idea Michel,
Memories and special moments are really meant to be well preserved for the future for that nostalgic feeling of the past. This will definitely create an unforgettable bond with whoever you gift this. I also love the fact that they are simple to make with simple tools.
Especially today which is a boxing day, putting fond memories in a unique box is a very good idea. You have made it so simple by writing the step by step of making it and even applying your own technique to make it a wonderful present.
Thanks Kabirat, I thought this memory box appropriate for Boxing Day.